How to optimise leverages for powerlifting
An introduction to leverages
Understanding leverages and applying them to powerlifting is essential to optimising performance, but first, we must understand the basics of leverages.
The fulcrum is the point at which the lever turns around.
The load is an object on the lever which applies a force to it acting towards the ground.
The effort stops or inhibits the load from causing the lever to just drop on the side which has the load, by applying a force which acts downwards on the opposite side to the lever.
The load arm is simply the distance between the fulcrum and the load, whilst the effort arm is the distance between the fulcrum and the effort.

If the effort and load weigh the same and if they are placed an equal distance away from the fulcrum, the lever will not turn in any direction, as the force acting downwards on both sides will be equal.
If the load though applies more force to the lever than the effort, then the lever will drop on the side of the load, as the force acting downwards on the side of the load will be greater. The same goes for if the effort was greater than the load.
However, if the effort and load apply the same force on the lever, but the effort is further from the fulcrum than the load (the effort arm is longer than the load arm), the lever will drop on the side of the effort. The same goes for if the load was further away from the fulcrum than the effort was. It is known as a mechanical advantage when the effort arm is longer than the load arm, and it is called a mechanical disadvantage when the effort arm is shorter than the load arm.
So why does having a longer effort arm than a load arm give a mechanical advantage?
The energy used to move a mass is equal to the force created by the effort multiplied by the distance between the effort and the fulcrum.
work done (J) = Force (N) x Distance (m)
By extending the effort arm moving a load is made easier. To explain why this is I’m going to be using the image of the seesaw below.

The left side of the seesaw is 3 meters longer than the right side, we’re going to be using the advantages that brings to raise the right side of the seesaw by getting the left side to go down, so the seesaw will become parallel with the ground.
The energy used to move the right side of the seesaw to parallel with the ground is always the same. Being that the effort arm of the seesaw is longer than the load arm it gives us a mechanical advantage.
Let us look at the maths behind this.
To figure out the force the 5kg load is creating we must multiply the mass by the gravitational field strength.
5kg x 9.8 N/kg = 49N
To make things easier we will just call it 50 N.
50N x 7m = 350J
This means 350J of energy is needed to lift the seesaw to parallel, we also know the left side of the seesaw is 10 meters long. We can therefore divide work done by distance to find how much force is needed to do this.
350J/10m = 35N
This means only 35N is needed to be created if you wanted to pull the seesaw down to parallel, as opposed to 50N which would have been needed if the seesaw was the same length on both sides.

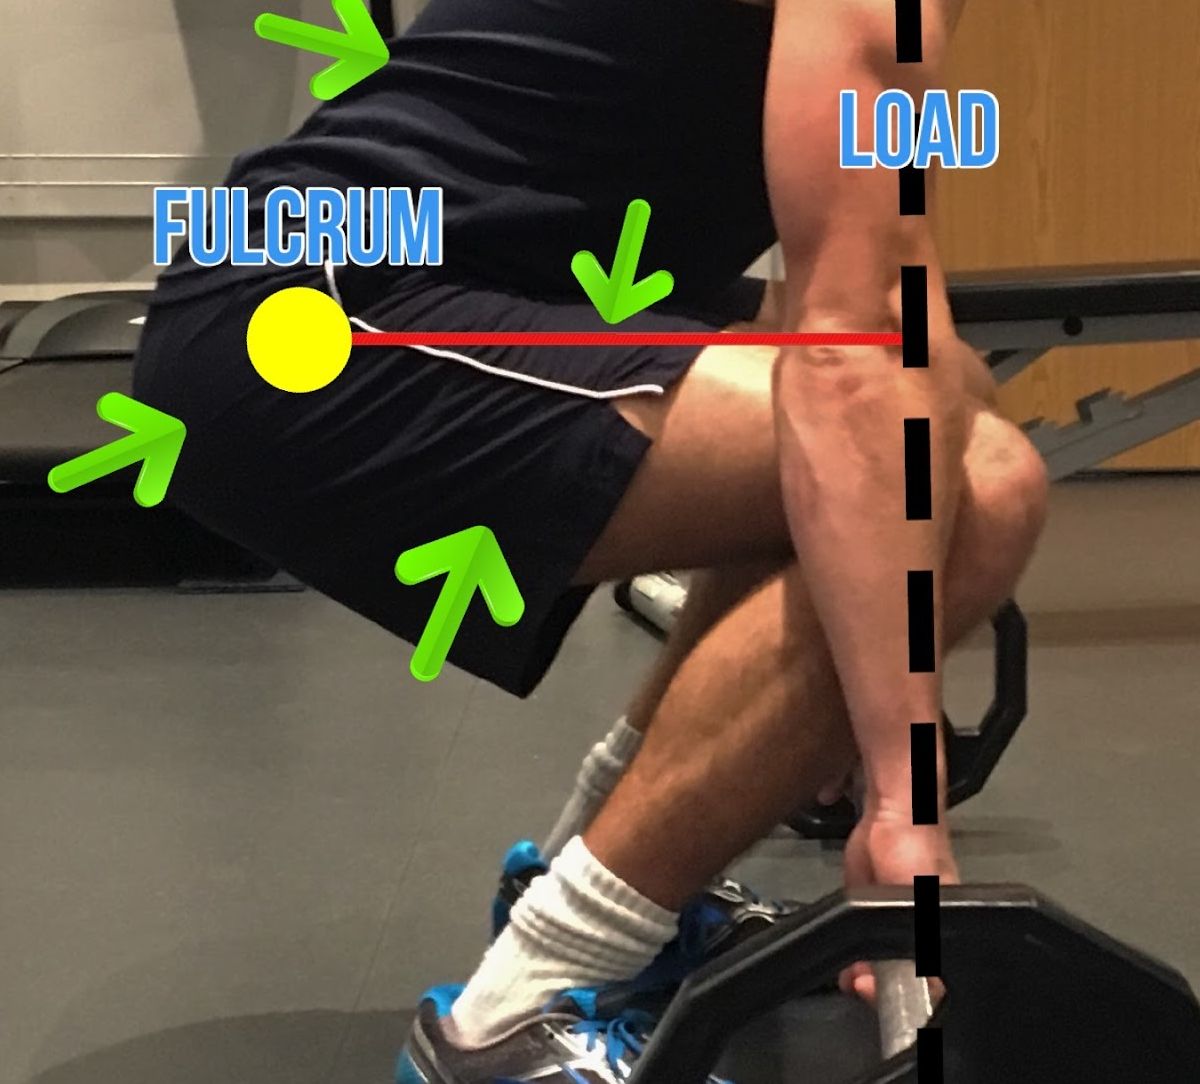
In powerlifting, the effort is created by the working muscle, for example, in the deadlift, these will be the muscles which have a green arrow pointing towards them in the image above (the erector spinae muscles, the hamstrings, quadriceps and glutes). The load arm will be the distance between the frontal plane which the barbell acts on due to gravity and the fulcrum, which is at the hips. Therefore using what we’ve already learnt it is safe to say that we want the load arm to be as short as possible.
In powerlifting, you also want the joint angles to be as small as possible so the muscles don’t need to work so hard. Range of motion (ROM) is often spoken about, and it is the distance over which a load is moved. You want it to be as small as possible, as a large ROM will mean you need to move the weight over a larger distance, but you also want a small ROM because a larger ROM will cause increased joint angles and worse leverages.
Squat leverages
The squat has 2 fulcrums, one at the hip and one at the knee, and there is therefore 2 load arms we need to concern ourselves with. You want both of these to be as small as possible. You can do this by widening your squat stance. Widening your squat will also challenge the stronger posterior chain muscles, the hamstrings and the glutes over the quadriceps resulting in more weight lifted.
There can be some setbacks however to widening your stance too much. For instance, some people's anatomy will not allow them to squat to parallel with a wide stance, also if your feet are too far out from shoulder width you may struggle to get the neural drive to the lower body musculature to push off the ground.
If your squat width is somewhat narrow begin experimenting with a wider stance slowly and carefully. Work around any problems that may be caused by a wider stance, such as the knees caving in during the concentric part of the lift, which will only increase the load arm and risk of injury. Increase your stance width by first lowering the weight and increasing the stance width by 5-20cm, squat to parallel or as deep as you can and pause for about 1-2 seconds at the bottom, try this form for about 1 mesocycle before making any adjustments, after 1 mesocycle you can attempt to make your stance wider or narrower. As soon as you feel comfortable with your new squat width you can begin squatting heavier and with a higher relative effort.

Equipped lifters are often seen squatting with an extremally wide stance as they can sit right back into their squat suit and maintain an upright posture making a wider stance easier.

So we’ve established that we want both the load arm of the knee and hip to be as small as possible, but we can adjust our form to make either one of them proportionally longer or shorter. Ideally, we would have the load arm at the hip significantly longer than the load arm at the knee. This is because the musculature that is responsible for hip extension (the hamstrings and glutes) is significantly stronger than the quadriceps that perform knee extension. Therefore if we want to make it easier on any muscle during the squat we want it to be the quads.

The best way to proportionally increase the load arm of the hips is to switch to the low bar squat. Which forces us to bend over more to keep stable over the centre of the foot and utilise the strong muscles of the posterior chain. If you don’t think that switching to the low bar squat will make that much of a difference think about how hard the front squat is when compared to the high bar squat, this is because the load arm of the knee is proportionally longer than the load arm of the hip when comparing the front squat to the high bar squat.

The best squatters in the world have short femurs when compared to their torso which means they can low bar squat whilst still maintaining an erect posture, this means that their hip angle isn’t excessive and the posterior chain musculature will not need to work as hard as they are moving over a smaller ROM to extend the hip and the muscles do not get stretched so much where they would otherwise be weaker.

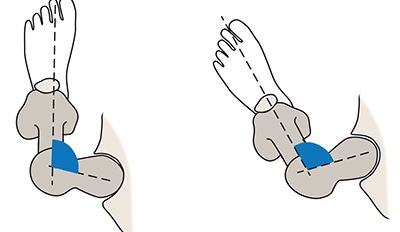
The shape of the pelvis affects how easy it is for a lifter to hit parallel during the squat. For example, if someone has retroversion of the hip, when the femoral head is angled further backward than normal at the pelvis, the femur will make contact with the acetabulum of the pelvis earlier. Another possible problem caused at the hip is in the depth of the hip socket and in the thickness of the femoral neck as if someone was to have a deep hip socket and thick femoral neck, then the femoral neck will likely hit the pelvis before a good amount of depth is allowed. Most people's issues with hitting depth are to do with the morphology of the hips rather than the flexibility of muscles and tendons, so take the time to adjust your form, as discussed earlier. Someone with more inward-facing hips may only be able to hit depth with a more narrow stance squat, whilst someone with more outward-facing hips may get more benefits from a wider stance squat.

Bench press leverages
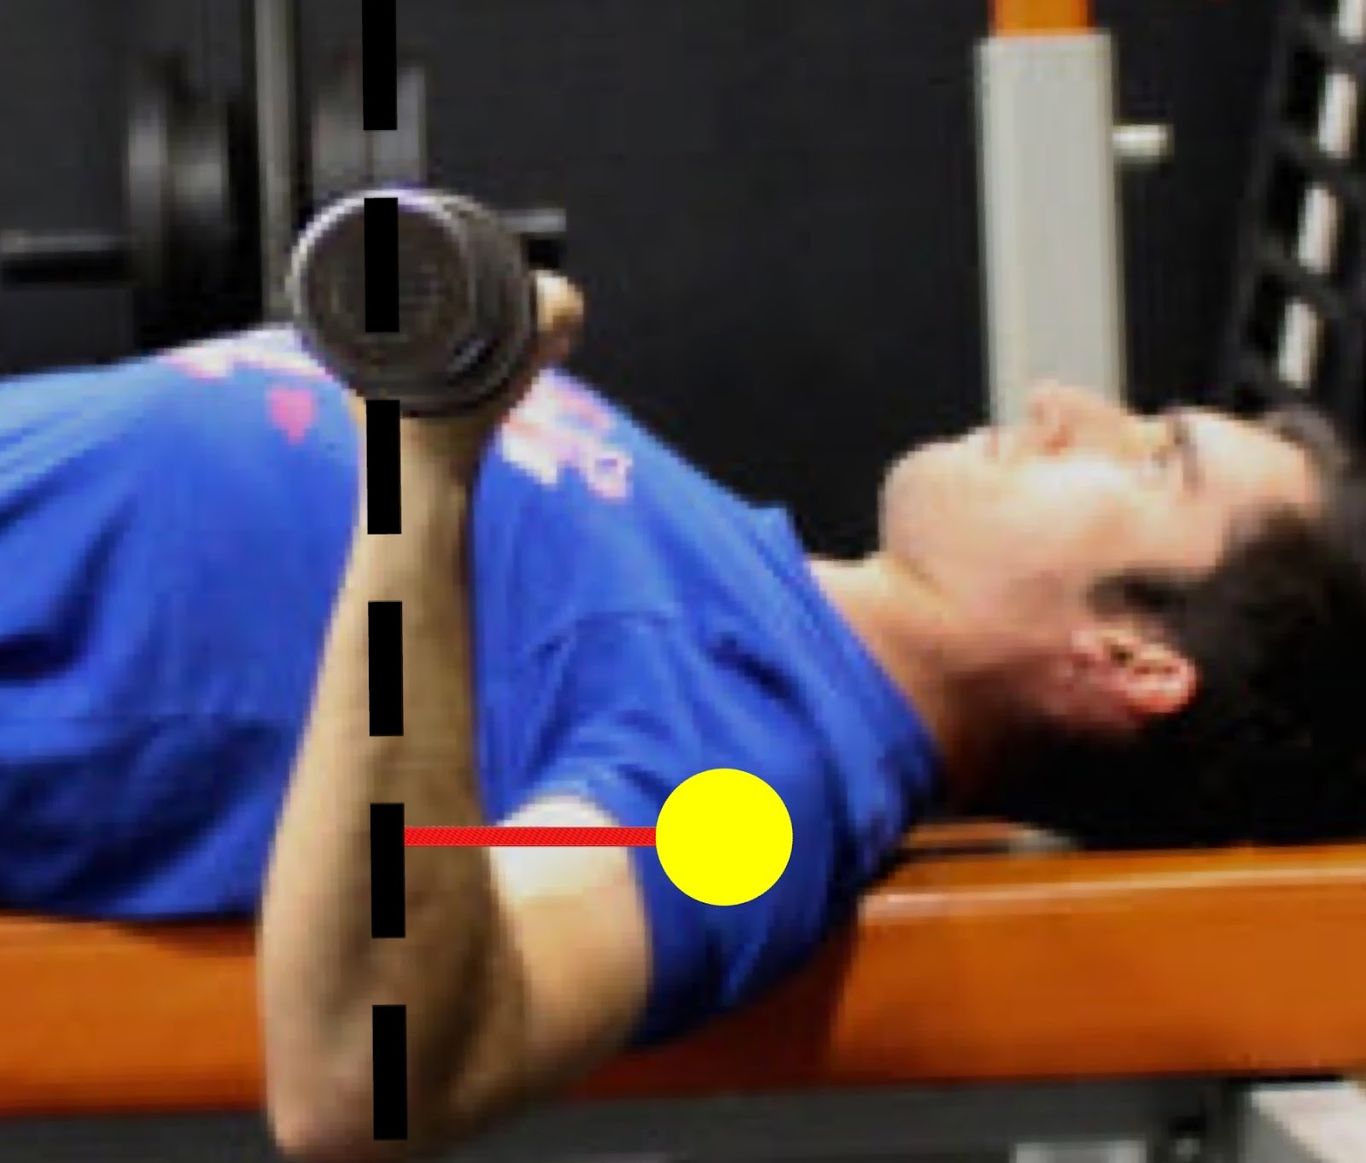
In the bench press the load arm is from the fulcrum at the shoulder to the frontal plane which the barbell acts on.

In the bench press, the load arm is from the fulcrum at the shoulder to the frontal plane which the barbell acts on. At lockout the barbell is directly over the shoulder joint, so there is no load arm, it makes sense to try and keep it this way by lowering the barbell directly down over the shoulder joint. But this will create a large ROM, and it will stretch the triceps and pectorals into a position where they can no longer perform a forceful contraction, this type of bench press also has the risk of causing inflammation and tears of the rotator cuff, as it becomes impinged during the lift.
Decreasing bench press ROM will make the lift easier, as the bar is travelling over a shorter distance, the joint angles will decrease and the muscles performing the lift will not become as stretched, the rotator cuff will also be less likely to become impinged. You can decrease bench press ROM by arching your back and bringing the bar close to the highest point of your arch, you can also widen your grip width. When you widen your grip width the exercise automatically becomes more chest dominant, this is because the joint angle at the elbow is smaller, so the triceps don’t need to work so hard to fully extend the elbow. It appears the best grip width to lift the most weight possible for the average person is the same as about 210% of shoulder width, but this will vary from person to person.
When benching the bar should be lowered from lockout to a high point of your arch, the exact position of this changes in different individuals. The bar path for the eccentric phase of the lift is slightly rounded, this lets the weight fall almost naturally, so you won’t get too fatigued from just the eccentric phase. On the concentric phase of the lift the ideal bar path has a J shape, this is known as the J curve.

The purpose of the J curve is so the bar travels the smallest distance possible before the bar makes contact with the body, which is necessary in a powerlifting competition, the bar then goes back towards the shoulders to decrease the load arm before it is pressed up.
Performing the bench press with the J curve is only really possible when nearing failure as the speed of the lift is slowed.
When benching raw lifters should always have their wrists positioned over the elbow as not to create a load arm between the elbow and the barbell, which will cause the triceps to work harder if the elbows are positioned closer to your pelvis than the barbell, or it may activate the biceps more if the bar is closer to your pelvis than your elbows resulting in decreased activation of the triceps.
Raw lifters often tuck their elbows, so the elbows are closer to the pelvis than the barbell this means they can wear a much tighter suit but the ROM is not made extreme by bringing the barbell down to the stomach area as opposed to the upper body.

The ideal bench press body type is someone with a large chest, and short arms, as this will help make the bench press ROM as small as possible.
Deadlift leverages
In the deadlift the load arm is from the fulcrum at the hip to the frontal plane which the barbell acts on.

Both the conventional deadlift and the sumo deadlift are the most popular kinds of deadlifts, and these are what we’re going to be focusing on.

The sumo deadlift has 2 advantages. One is that the load arm between the bar and the hips is shortened as the shins are driving more outwards as opposed to forward which would push the barbell forward, and the second advantage is that the bar needs to travel over a shorter distance before the lockout, as you simply are not as tall. This makes the sumo deadlift seem far better than the conventional deadlift, which it is for people, but the knee angle and hip angle is far more closed at the start of the conventional deadlift, meaning the surrounding muscles are not as stretched and they don’t need to work as hard to perform knee extension and hip extension.
Rounding your back ever so slightly during the conventional deadlift will decrease hip and joint angle and shorten the load arm, this is because the body isn’t positioned so far over the barbell pushing the bar further away.

There are problems with rounding your back however. One obviously is that it increases the risk of injury if not performed correctly, and secondly it relies on the erector spinae muscles to extend the back to lockout the barbell, the erector spinae muscles are not designed to do this, instead, their main purpose is to work isometrically, they, therefore, may struggle to lockout the barbell, and therefore limit the amount of weight you can deadlift.
To put it simply the limiting factor on the conventional deadlift is typically the lower back, whilst it is typically the lower body muscles for the sumo deadlift. So if your back is stronger than your legs you probably going to pull more conventional, but if your legs are stronger than your back your probably going to pull more sumo. Someone with long arms will not need to bend over as much and there therefore will be less demand on the back, these types of people will therefore typically benefit more from the conventional deadlift. Someone with short arms will need to bend over more and there will be more demand on the back, these types of people will therefore typically benefit more from the sumo deadlift.
A benefit of the sumo deadlift when using a deadlift bar is that the bend of the bar skips the bottom part of the deadlift, this is where the deadlift is hardest for the sumo deadlift. Whilst conventional deadlifts typically struggle more at lockout. I will also mention that the deadlift bar is also useful to reduce ROM.

The semi-sumo deadlift gives you a mix of the benefits of both lifts, you still get the power of the ground like the sumo deadlift and you can still round your back like you can in the conventional deadlift. People who benefit the most from the semi-sumo deadlift are typically long limbed people, but with their legs slightly longer than their arms.

You should take your time to try each of the conventional, sumo and semi-sumo deadlifts for at least one mesocycle, to see what works best for you.
Grip width should be as straight to the bar as possible, so the bar won’t need to travel as far before lockout, this may be difficult to do with the conventional deadlift as your legs may get in the way and you do not want your thumbs rubbing on your legs as you execute the lift as this will create unnecessary friction.
Another tip to reduce ROM is to not grip the bar in the palms of the hands, instead, hold the bar more in your fingers, this will also allow you to pull the bar off the ground with smaller joint angles and with a smaller load arm, it is also better for grip strength.
The ideal body type for deadlifts is someone with short legs, a short torso and long arms.
Disclaimer: use the information provided in this article at your own risk, as I will not be liable for any harm that may be caused by it.
